Friday, August 13, 2010

Preparing your NAS for Fedora

Well my new DoM finally arrived and I started playing. I currently have a USB stick that installs Fedora 15 via the serial port, and does that all without user interaction (!). After installation you end up with a Thecus that runs Fedora 15 and has FTP, SMB, NFS & Webmin enabled by default.

So I'll start posting about this to get you through it.

First and foremost,  you need to prepare your hardware :). Here's what you need to do!

  1. Read a bit about the hardware components of your Thecus 5200 PRO on http://naswebsite.com/wiki/Thecus_N5200Pro_Hardware
  2. Disconnect your raid disks to avoid accidental damage to the raid. Don't worry about disconnecting the drives: Thecus uses linux software RAID so you can easily recreate that in any Linux setup, even in your home PC. In a few posts I'll show you how to do it. Even though the installer I prepared will only use the DoM, just disconnect them to prevent the installer from using them as OS drive by accident. I only tested it on my own Thecus where - with the disks inserted - the installer cleanly ignored them and only looked at the new DoM and the USB key, as intended, but I don't want you taking the risk and blaming me :). As said, afterwards you can reconnect the drives easily and reassemble the raid array.
  3. Get or buy a serial cable. If you don’t have a serial port on your PC, buy a serial-to-usb adapter
    • Mine’s from Belkin and it uses the Prolific PL-2303 chip. This chip has native support under Linux and the drivers for Windows (7 & Vista included) can be found here.
    1. Buy a new DOM which has a horizontal setup, 44 pins (not 40!) and that is at least 2GB. I have a 4GB Transcend module TS4GDOM44H-S.
    2. While you are upgrading, you might consider upgrading the RAM. I bought this 1GB RAM module which I can confirm works without any BIOS alterations. 
    3. Remove the standard Thecus DOM. BE CAREFUL and BE GENTLE! Lift the old DOM with both sides equally and do not put too much pressure. There is a substantial risk you will bend the pins of the connector and from then on it is over and out with your Thecus (do not ask me how I know this ;-)) 
    4. Insert your new DOM gently!
    5. Since the DOM is blank, the 5200 PRO will now search for a CD-ROM when booting (which it will not find unless you connect one) and afterwards will boot from a USB stick.
    6. That's it, your Thecus is now ready to be reinstalled with Fedora 13 (or any other Linux distribution for that matter).

    Next I'll post on how to prep the software and the USB with my custom, unattended install image.

    Friday, July 30, 2010

    Creating a Fedora 15 USB installer that uses the serial console

    UPDATE: with the release of Fedora 15 some changes needed to be made to the syslinux.cfg file. Where before you had to explicitely say where the stage2 files were, now you don't need that anymore (yay!). I adapted the lines below.

    Introduction


    The Thecus 5200 PRO NAS is nothing more than a PC based on an Intel processor with some extra stuff (like many SATA ports and low power consumption) and some stuff missing (like a VGA connector). This means you can run any OS on it, if you just put your mind to it :).

    If you are looking around the net on how to run alternative Operating Systems on your Thecus NAS, you often see people trying to hook up to the VGA pins of the motherboard of the system, hoping to be able to tap into the BIOS settings. If you're like me and do not even know how to begin soldering, that kind of poses a problem. Luckily there's an alternative way to install a custom OS on the Thecus NAS.

    You see any linux distribution has a text based installer. And you can instruct the kernel at boot to run that text console over the serial port. Now that's all fine but the Thecus still has to boot from something else than its built-in disk.

    Well it turns out that if the Thecus does not find its first disk, it will boot from any USB key you stick into it. Ergo: remove the Thecus own disk (the Disk-On-Module to be correct), plug in a bootable USB key that gives you a serial setup and you are rocking.

    Here's how I turned Fedora into such a serial install thing.


    Preparation of the Software

    • Download the Fedora 32-bit Network installation disc: Fedora-15-i386-netinst.iso. Every Fedora ftp mirror has this, I used this one.
    • Download the Fedora Live USB creator and install it.
    • Insert a 256 MB or higher USB key in your PC, format it and install a nice bootloader
      • I use the bootice program by ipauly
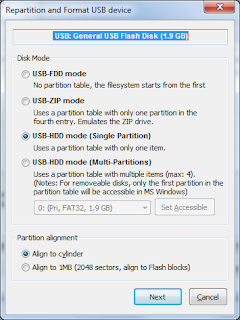
      • Format your USB by selecting "Parts Manage", "Reformat USB disk", select "USB-HDD" and choose "FAT32" as disk format.

      • Add the UltraISO USB-HDD+ bootloader by choosing "Process MBR" and then "Install / Configure"
    • Run the Live USB creator
      • Select your USB key (under Target Device)
      • Select the iso file you downloaded in step 1 (with the Browse button).
      • Let it create the bootable USB stick by pushing “Create Live USB”.

    Now comes the tricky part: we need to tell this stick to boot into the text installer over the serial console. Sounds very daunting but this is actually quite easy (once you figured it out :)).

    • Browse to the USB stick and find the folder syslinux.
    • In that folder there is a file syslinux.cfg. Edit this file so that it contains only the following lines at the beginning of the file. Make sure the text after "default" is one continous line:

      SERIAL 0 115200
      CONSOLE 0


      default vmlinuz initrd=initrd.img noselinux serial text console=ttyS0,115200n8 utf8 lang=en rdblacklist=floppy
    • If you are editing under Windows, please use Notepad++ or any other text editor that understands the difference between Windows and UNIX text formats and save in UNIX format.

    That’s it! You now have a USB stick that will boot and open a serial terminal for you to do a text based minimal install of Fedora 15. Installing from this stick will give you a running system, accessible via SSH and fully customizable with yum. For the true DIY'er, the fun than just starts.


    Next steps

    As I'm fiddling with this thing and learning stuff, here's what I will still post about:

    • Preparing the hardware. What you need to modify on your Thecus to prepare it for a custom OS install
    • Screenshots of the actual install on my Thecus. I can't run my own install yet since I'm still waiting for my own DOM at the moment, a 4GB Transcend module TS4GDOM44H-S.
    • Extra configuration of the bare installation. When I'm finished I want a NAS that does:
      • SSH
      • vsftpd, the best ftp server out there
      • Webmin for web-based administration
      • Transmission Torrent Client
      • Print Server
      • Driving the little LCD front panel to display useful information :)

    And my end goal? To have a respin of Fedora that is on a USB stick, and automatically installs all this on a fresh DOM in a Thecus, so that users at least can breathe some extra life in this little puppy.